
Do you want to change the default sender name and email address for outgoing WordPress emails?
In this article, we will show you how to easily change the default sender name and email address in outgoing WordPress emails.
Method 1. Changing Default Sender Name and Email using WP Mail SMTP
This method is easier and recommended for all WordPress users.
For this method, we’ll be using the WP Mail SMTP Pro plugin. It is the best WordPress SMTP plugin on the market, used by over 1 million website owners.
This plugin allows you to easily change the default sender name and email address for outgoing WordPress emails. It also helps you fix the WordPress email deliverability problem.
First thing you need to do is install and activate the WP Mail SMTP Pro plugin.
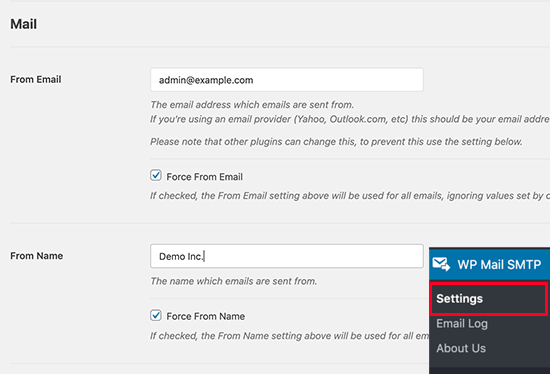
Upon activation, you need to visit WP Mail SMTP » Settings to configure plugin settings. Under the Mail section, you can simply enter the email address and the name you want to use to send WordPress emails.
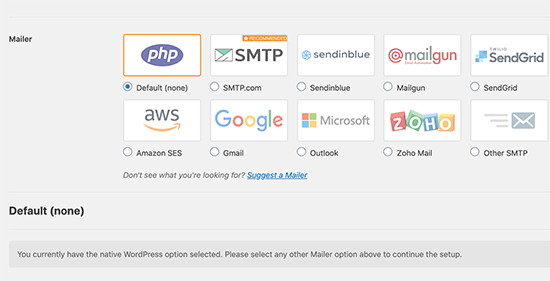
If you choose an SMTP service, then follow the on-screen instructions to connect the plugin with your SMTP service provider.
Don’t forget to click on the ‘Save Settings’ button to save your changes.
Test Your WordPress Emails
WP Mail SMTP Pro also allows you to test your WordPress email settings. Simply go to the WP Mail SMTP » Settings page and switch to the ‘Email Test’ tab.
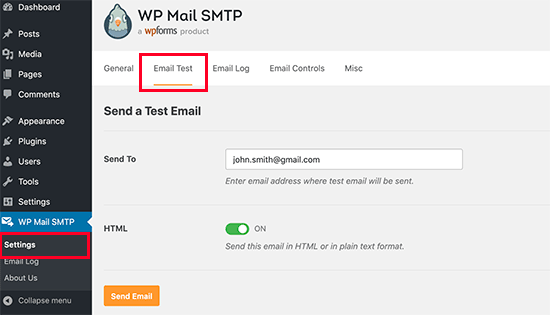
From here, you just need to provide an email address that you can access and then click on the ‘Send Email’ button.
The plugin will now send a test email to the address you provided. You can check your inbox to make sure that you can receive WordPress emails, and it has the correct sender name and sender email address.
Method 2: Changing Default Sender Name and Email using a CB Change Mail Sender
This method is only recommended if you don’t use an SMTP service, or the first method is not working for you.
Using this method does not improve your WordPress email deliverability or make it easier to troubleshoot email issues. However, if your WordPress emails are working, then it will allow you to change sender name and email address.
Upon activation, you will notice a new menu item labeled CB Mail Sender in your WordPress admin bar. Clicking on it will take you to plugin’s settings page.
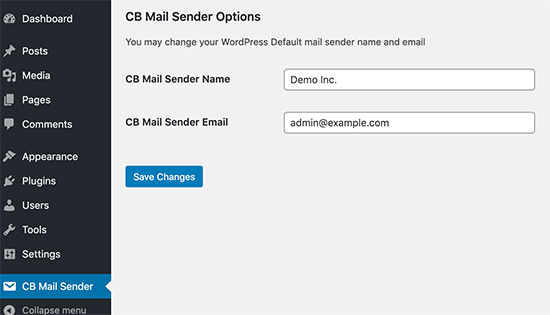
You will need to enter the name and email address you want to be used for outgoing WordPress emails.
Don’t forget to click on the save changes button to store your settings.
That’s all, your WordPress notification emails will now show the name and email address you entered in plugin settings.
There is no method provided by the plugin to test your email settings. You can do that by performing actions that generate WordPress notification emails like creating a new user, requesting a password reset, and more.
Method 3: Manually Change Sender Name and Email Address
This method is not recommended for beginners. This method requires you to paste code into your WordPress files. It also does not fix any email deliverability issues and is harder to troubleshoot.
// Function to change email address
function wpb_sender_email( $original_email_address ) {
    return 'tim.smith@example.com';
}

// Function to change sender name
function wpb_sender_name( $original_email_from ) {
    return 'Tim Smith';
}

// Hooking up our functions to WordPress filters
add_filter( 'wp_mail_from', 'wpb_sender_email' );
add_filter( 'wp_mail_from_name', 'wpb_sender_name' );
This code simply replaces the default WordPress sender name and email address with your custom sender name and email address.
You can test this by adding a new user, changing passwords, or any other action that sends a WordPress notification email.
We hope this article helped you learn how to change the sender’s name and email address in outgoing WordPress emails.
So that’s it for now, Hope you guys like this. We will come up with another blog post soon. Contact us for any query. Follow us on Facebook