1. Create an HTML Form
At first, let’s create an HTML FORM that collects data from the user. To create HTML form copy the code below in your index.php file.
					<div class="ajax-form">
  <div class="container">
    <div class=row>
      <div class="col-md-6 col-md-offset-3 form-box">
       <form action="" method="post" class="ajax"
enctype="multipart/form-data">

         <h1>Ajax Form</h1>

         <label><b>Name</b></label>

          <input type="text" placeholder="Enter Your Name" name="name"
required class="name">

         <label><b>Email</b></label>

         <input type="email" placeholder="Enter your Email" name="email"
required class="email">

         <label><b>Message</b></label>
          <input type="textarea" placeholder="Message" name="message"
required class="message"><hr>
            <div id="msg"></div>
              <input type = "submit" class="submitbtn" value="submit">
<div class="success_msg" style="display: none">Message
Sent Successfully</div>
                  <div class="error_msg" style="display: none">Message Not Sent, There is some error.</div>
    </form>
   </div>
 </div>
</div>
The above HTML contains <form> tag which consists, text fields for Name, Email, and Message. To process this form and submit data using AJAX, we need jQuery file which is already inbuilt in the latest WordPress.
2. Using AJAX to submit the form
Now, we are going to use jQuery to handle our AJAX request. Create the file name main.js under the js folder inside your theme folder. In this file, we’ll place code for Ajax call.
					jQuery(document).ready(function($){
$('form.ajax').on('submit', function(e){
   e.preventDefault();
   var that = $(this),
   url = that.attr('action'),
   type = that.attr('method');
   var name = $('.name').val();
   var email = $('.email').val();
   var message = $('.message').val();
   $.ajax({
      url: cpm_object.ajax_url,
      type:"POST",
      dataType:'type',
      data: {
         action:'set_form',
         name:name,
         email:email,
         message:message,
    },   success: function(response){
        $(".success_msg").css("display","block");
     }, error: function(data){
         $(".error_msg").css("display","block");      }
   });
$('.ajax')[0].reset();
  });
});
Basically, above Ajax code will,
1. Capture the form submit button so that the default action doesn’t take place.
2. Get all of the data from our form using jQuery
3. Submit using Ajax
4. Show a success message and error message if there are any.
Enqueue Ajax call: Put the following code in your function.php in Enqueue scripts and styles section
					function ajax_form_scripts() {
	$translation_array = array(
        'ajax_url' => admin_url( 'admin-ajax.php' )
    );
    wp_localize_script( 'main', 'cpm_object', $translation_array );
}
}
add_action( 'wp_enqueue_scripts', 'ajax_form_scripts' );
Hook to Handle Ajax Request: ‘ wp_ajax_nopriv_’ is for not logged-in user, it only fires when the user is logged out. ‘wp_ajax_’ is for the logged-in user.
					// THE AJAX ADD ACTIONS
add_action( 'wp_ajax_set_form', 'set_form' );    //execute when wp logged in
add_action( 'wp_ajax_nopriv_set_form', 'set_form'); //execute when logged out
Functions that handle form inputs and send an email. Copy these code and paste in function.php
					function set_form(){
	$name = $_POST['name'];
	$email = $_POST['email'];
	$message = $_POST['message'];
	$admin =get_option('admin_email');
	// wp_mail($email,$name,$message);  main sent to admin and the user
	if(wp_mail($email, $name, $message)  &&  wp_mail($admin, $name, $message) )
       {
           echo "mail sent";
   } else {
          echo "mail not sent";
   }
	die();

}
From the above code, the value is retrieved, incremented and saved. When we echo the value, this will be the response. The only thing to note is that you must use die() at the end. If we do not put then admin-ajax.php will execute its own die(0) code, echoing an additional zero in your response.
Now from all these above codes, we can create the WordPress Ajax-Form that sends the mail to the user and admin.
Store the data in Custom post
To send the data in custom post at first we need to create the custom post and some Meta fields. You can follow this link to create the custom post type and Create the Meta field. After creating the custom post and meta field, copy the following code in function.php
These code store the Name and message in the custom post
					//To Save The Message In Custom Post Type
$new_post = array(
   'post_title'    => $name,
   'post_content'  => $message,
   'post_status'   => 'draft',           // Choose: publish, preview, future, draft, etc.
   'post_type' => 'ajaxform'  //'post',page' or use a custom post type if you want to
);
These codes store the email in the Meta field.
					// show the email in meta box
$pid = wp_insert_post($new_post);
if ( empty( $email ) OR ! $email )
   {
       delete_post_meta( $pid,  'meta_email');
   }
   elseif ( ! get_post_meta( $pid, 'meta_email' ) )
   {
       add_post_meta( $pid, 'meta_email', $email );
   }
   else
   {
       update_post_meta( $pid, 'meta_email', $email );
   }
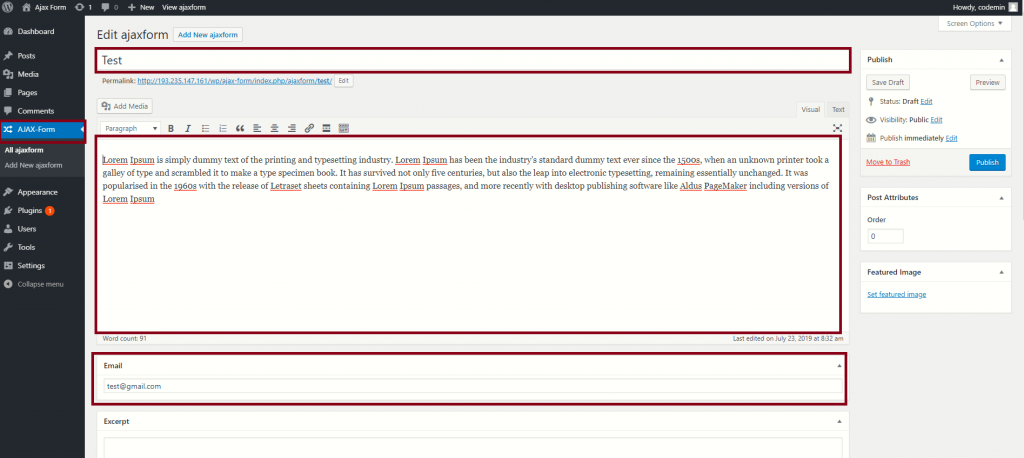
Here is the screenshot of the custom post where data is stored,
We hope this article helped you learn how to change the sender’s name and email address in outgoing WordPress emails.
So that’s it for now, Hope you guys like this. We will come up with another blog post soon. Contact us for any query. Follow us on Facebook