
I was recently working for a client who required the ability to send an Thankyou SMS to users when they submit gravity form.
Setting Up Your Twilio Account Keys
To begin with you will need to create a free Twilio account, this is the service that will handle the sending of the text message once triggered to do so by WordPress.
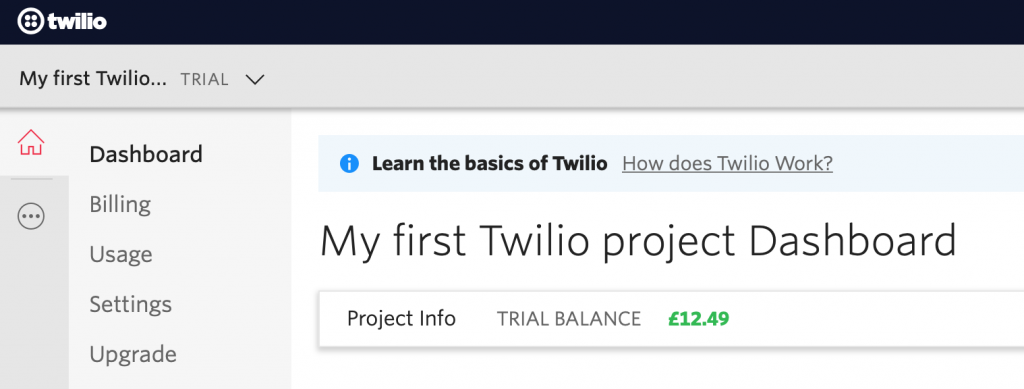
After your registration is complete you should be taken to your account dashboard as shown below.
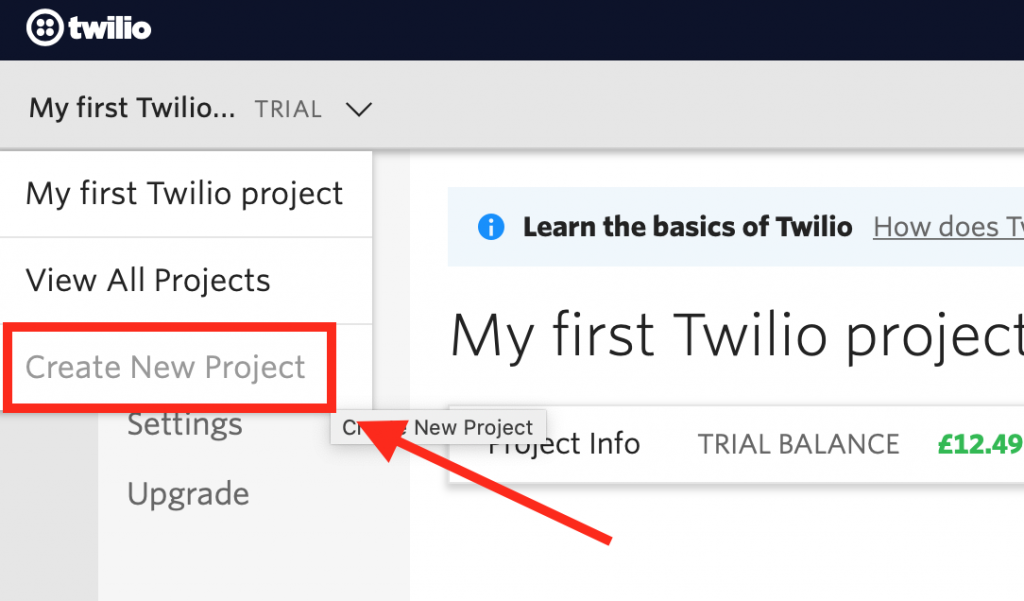
You will then need to head to the dropdown menu located in the top left-hand corner and select the option ‘Create New Project‘.
Next comes a number of project setup steps asking for the following information:
- Project Name (I would recommend just using your website title)
- Email Verification (Either a personal or business email for verification and communication purposes only)
- Mobile Number Verification (Use a personal or business mobile number here, it will mainly be used for account verification and never anything public-facing, you can use the same number you provided when first creating your Twilio account)
Following these initial details you will start to be asked about your intended integration options, you can skip past these for now as we will be covering everything in this article. You can skip this stage by answering ‘No‘ to the questions regarding whether you are comfortable with coding, and then select ‘Skip To Dashboard‘.
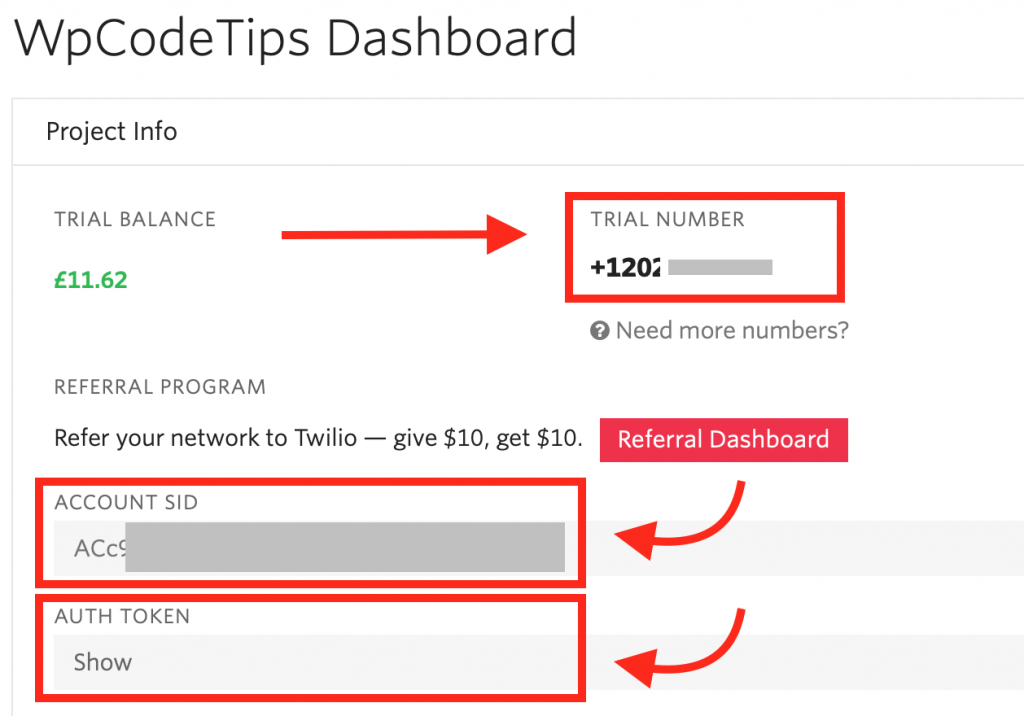
All being well, you should now be taken back to your original dashboard with your newly created project now visible. Next up you should click ‘Get A Trial Number‘ and complete the short verification process, this should leave you with an account page which shows you a trial number, Account SID and Auth Key as shown below.
Using wp_remote_post to trigger the Twilio API
The communication between WordPress and your Twilio account will exist by making use the Twilio REST API, if this is your first experience with an API then fear not as we will explain everything you need to know. We are not going to go into the depths as to what an API is here, but for now, all you really need to know is that is stands for an ‘Application Programming Interface’ and is basically a programmatic way for two different systems to communicate and pass information and functionality with ease.
In our example we need to use WordPress to send, or ‘post’, information over to Twilio such as the message and number we wish to send to, for Twilio to receive, understand, and process. Thankfully, WordPress has a function readily available to do just that in wp_remote_post(). Let’s get stuck into the code.
We can start with a very basic PHP function to add to our theme’s functions.php file. considering that the only things that might change as we reuse it are the SMS message and the number we wish to send to, we can set those as the two arguments.
We can also go ahead and add three variables for the values we kept aside from our Twilio set up, make sure to change the values to your own as labeled in the code!
					 // Change to your account SID
    $accountSID = 'XXXXXXXXXXXXX';
    // Change to your account Auth Key
    $authKey = 'XXXXXXXXXXXXX';
    // Change to your account trial number
    $sendNumber = '+XXXXXXXXXXX';
Now that we have all the necessary values in place, we can introduce the function to post the data to the Twilio API, you might find the next block of code a little mind-blowing if this is fairly new to you. The principle of what is happening is that we will be sending information over to a URL which will be expecting to receive and process it, this information is also sent alongside an authorisation value to ensure you have the permission to do so.
I also fully recommend you read up the depths of the wp_remote_post() function as well here, unless you simply plan on copying the final code.
Before using this code there are two very important things to remember:
- Whilst your Twilio account is in trial mode you will only be able to send SMS messages to the number you verified within your account
- All mobile numbers handled by Twilio must be in the E.164 format to work
					add_action( 'gform_get_input_value_2', 'set_post_content', 10, 4 );
function set_post_content( $value, $entry, $field, $input_id ) {
	$accountSID = 'XXXXXXXXXXXXX';
	$authKey = 'XXXXXXXXXXXXX';
	$sendNumber = '+XXXXXXXXXXX';

	$sendTo = '+012345678910';
	$myMessage = "Hey this is my first SMS message";

	$url = "https://api.twilio.com/2010-04-01/Accounts/".$accountSID."/Messages.json";
	$data = array(
			'From' => $sendNumber,
			'To' => $sendTo,
			'Body' => $myMessage
		);
	$headers = array( 'Authorization' => 'Basic ' . base64_encode($accountSID . ':' . $authKey));
	$result = wp_remote_post($url, array( 'body' => $data, 'headers' => $headers));
	return json_decode($result['body'], true);

}
We hope you have found this article useful. I would love to hear the way in which you are making use of it within your websites. On the other hand, if you are struggling to make it work then please let me know in the comments below and I will try my best to assist you!
So that’s it for now, Hope you guys like this. We will come up with another blog post soon. Contact us for any query. Follow us on Facebook